Laura Mcdonald On How To Personalise Your Home
With summer nearly upon us what better time to shake things up in the home and get creative.
To get those creative juices flowing we grabbed five minutes with Laura Mcdonald, graphic designer and upcycling expert at Rust-Oleum. With her creative credentials we thought Laura would be the perfect person to give us some quick and easy ideas on how to inject creativity into the home.
Here, she talks us through a few of her favourite projects…
1. Making the everyday unique…
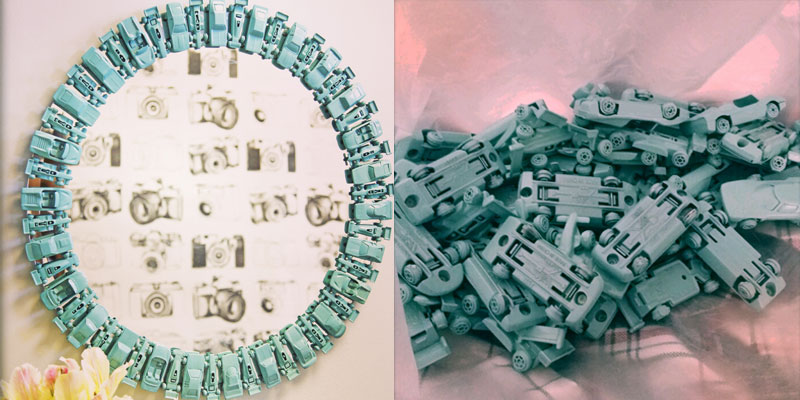
“This is one of my favourite projects! I sourced a mixture of toy cars from eBay and a cheap, frame-less mirror from Ikea.
After a quick clean I sprayed the cars with Rust-Oleum Mode Primer before adding a coat of Rust-Oleum Mode Pure Aqua. It was important to prime the cars to ensure the different designs didn’t show through.
Once dry I then laid out the cars on the mirror before securing to the mirror to ensure I was happy with the arrangement and order of car styles. I then used just a small squeeze of glue to attach each of the cars.
One tip would be to make sure to spray paint the underneath of the cars, wheels and any gaps, as the mirror will reflect any areas you have missed!”
2. Upcycling the dated…
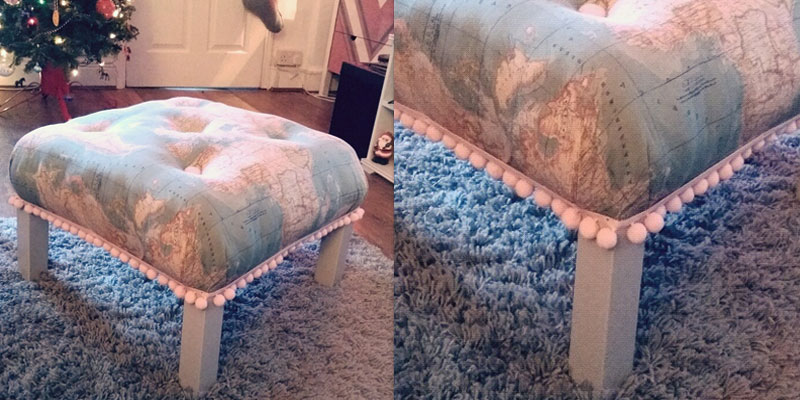
“This footstool started out life as a small table that I found in the damaged section of Ikea. I unscrewed the legs and cut them down in-line with the height of my sofa. As there was a chip in the top of the table I purchased a piece of foam the same size as the table top, laid the fabric over it (enough to cover the foam and reach underneath the table) and marked where I wanted the buttons with a faint pen mark.
I covered the buttons with light pink felt and threaded them with strong string (doubling it up for extra strength) with an upholstery needle. I then threaded the buttons through the fabric and foam leaving two strands for tying on the other side.
When all buttons were attached, I stapled all sides of the fabric to the underside of the table, folding the corners neatly and making sure to pull the fabric taught. I then screwed the legs back on and finished the edges with a light pink pompom trim to match the buttons.”
3. Extending the life of the humble tin can…
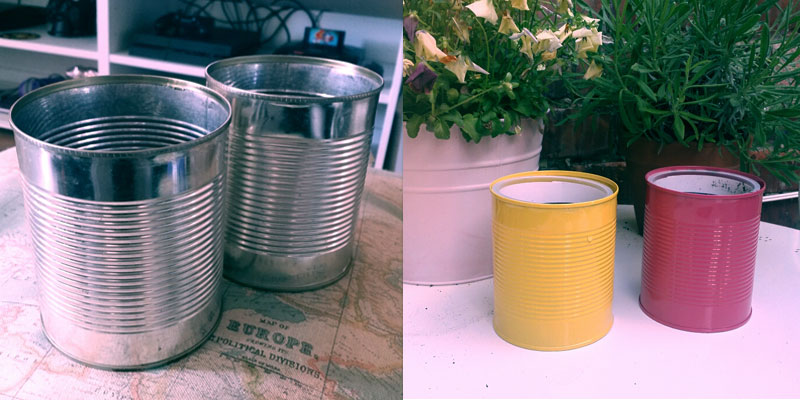
“No matter what season I love spending time in my garden so I decided to create some herb planters and tea lights from old tin cans. I collected a selection of them, soaked them in warm water to remove the labels and gave them a good clean.
The candles holders were really simple to make. I drilled heart and star designs into the front of the cans using several round holes to make up the shapes before priming them with grey Surface Primer. I then gave them a splash of colour with Painter’s Touch in French Lilac.
When upcycling the tin cans into herb planters I primed them with grey Surface Primer and selected two bright colours that complemented each other — Painter’s Touch in Berry Pink and Sun Yellow. After a couple of coats they were ready for the soil and seeds. These now take pride of place on our yard table but would also look the part on a kitchen windowsill.
If you fancy giving it a go remember to drill some drainage holes in the bottom of the cans before painting so that your herbs or flowers don’t become water logged!”
4. Transform a £12 table into an expensive looking feature piece…
“I love rummaging through second hand furniture shops and came across this table in one of my local stores, Kasbah in North Shields. I haggled with the shop owner and got the table for just £6 (originally £12) – so it was a real bargain.
After cleaning the table, I started with the wheels. The metal on the wheels was old and stained so I decided to spray paint it gold with Metallic spray paint in Bright Gold. I masked off all the black sections of the wheels and protected the legs of the table with newspaper.
Once the spray paint was dry, I painted the whole table with Chalky Finish Furniture Paint in Winter Grey.
To tie in the gold wheels with the rest of the table I searched on Pinterest for inspiration as to a pattern for the bottom surface. I found a chevron style design and copied it onto the surface with masking tape, using scissors and a ruler to create the angles before spray-painting the chevrons with the same Bright Gold paint. The whole table was then finished off with a couple of coats of clear Furniture Finishing Wax.
For a flawless finish I would suggest using a roller instead of a brush!”
